Educational Technology is "the study and ethical practice of facilitating learning and improving performance by creating, using, and managing appropriate technological processes and resources".
Educational technology is the use of both physical hardware and educational theoretics. It encompasses several domains, including learning theory, computer-based training, online learning, and, where mobile technologies are used, m-learning. Accordingly, there are several discrete aspects to describing the intellectual and technical development of educational technology:
- educational technology as the theory and practice of educational approaches to learning
- educational technology as technological tools and media that assist in the communication of knowledge, and its development and exchange
- educational technology for learning management systems (LMS), such as tools for student and curriculum management, and education management information systems (EMIS)
- educational technology as back-office management, such as training management systems for logistics and budget management, and Learning Record Store (LRS) for learning data storage and analysis.
- educational technology itself as an educational subject; such courses may be called "Computer Studies" or "Information and communications technology (ICT)". (https://en.wikipedia.org/wiki/Educational_technology)
Non - projected visuals also has display materials that are often seen in the classroom which can be used for a wide range of teaching and learning. (Educational Technology 1, 2015)
Non - projected visuals are those aids which are used without any projection. So they translate abstract ideas into a more realistic format. They allow instruction to move from verbal representation to a more concrete level.
Advantages of Non - Projected visuals
- Abundant and are easily obtainable.
- Requires no electricity
- Appropriate for low budget
- Not much artistic ability is required in the use of these visual aids.
- Can be used in many ways at all levels of instruction and discipline
- Used to stimulate creative expression such as tell stories or writing stores
- Many of them can be converted into projected aids.
- Some of them can be projected through an opaque projector.(Educational Technology:Non-Projected Media, 2015,edtechnonprojectedmedia.wordpress.com,)
Non - Projected Display Materials
- Blackboard
Blackboard is the most common display surface in the classroom. It can be used as a surface to draw visuals to support verbal communication.

http://blogclan-2.wikia.com/wiki/File:Blackboard.png
Techniques in using the Blackboard
It may seem very simple to use the blackboard, but there are ways on how to effectively use it (Heinich, 1993).
- Check the visibility of the board from several position around the room to be sure that there isn't any glare on the surface.
- Plan the things you are going to write.
- Use drawing aids such as rulers and templates to save time and to improve the quality of your drawings.
- Print neatly rather than using script. For 32 foot long classrooms, the letters should be 3 to 3.5 inches high, and the lines forming the letters should be a quarter-inch thick.
- Hold the chalk or marker at an angle so it won't make scratching or squeaking noises.
- Use color for emphasis. Two or three different colors are fine.
- Put guidelines to help you write in straight line. A water soluble felt tip marking pen will do . Don't talk on the board. Face the class when you're talking. Move around so you don't block what you've written on the board.
- The board should be completely erased after each use. Don't let marks remain on board overnight. Old marks can be erased by tracing over them with a black erasable marker and then erasing immediately.
- For general cleaning, simply wipe the board clean with a soft, damp cloth.
- The erasable markers should be kept tightly capped and stored in a horizontal position to prevent them from drying out.
- Vary your presentation techniques. Do not overuse or rely entirely on the board.
2. Multipurpose Board
It is a board that is used for several purposes such as for announcements or special events or occasions, reminders, things to do, etc. It is also called panel board.
 |
| Captured by: Avila, R.D.,2017 |
3. Bulletin Boards
It is a surface used for decorative, motivational and instructional purposes. It can hold pins, thumbtacks, and other sharp fasteners without damage to the board.
 |
| Bulletin Board. Retrieve from: http://www.uft.org/galleries/photo/uft-bulletin-board. Retrieved date: Nov. 19. 2017 |
- Decorative bulletin board is used to create visual stimulation to the environment. Almost each classroom has a bulletin board to serve as a decoration.
 |
| Decorative Bulletin board. Retrieve from: http://www.bulletinboarddesigns.net/summer-bulletin-board-ideas-2. Retrieve date: Nov. 19, 2017 |
- Motivational bulletin board is used to display the achievements of students and to reinforce their efforts to do a good job.
 |
| Spotlight Bulletin board. Retrieve from https://www.pinterest.com/explore/spotlight-bulletin-board/. Retrieved date: Nov. 19, 2017 |
- Instructional bulletin board is used to support instruction. Here, the bulletin board is used to provide students with key information or as a means of communication between several different classroom stakeholder.
 |
| Curriculum, Instruction, Assessment. Retrieve from: https://www.sesd.org/Page/994. Retrieve date: Nov. 19, 2017 |
3.1 Developing a Bulletin Board Display
Developing a bulletin board is the task of a classroom teacher so that classroom will look attractive and inviting to the students. The following are ways on how to develop a bulletin board display (Heinich, 1993).
- Decide upon an object. Limit the display to one topic or objective. Presenting more than one main idea usually results in confusion on the part of the viewers.
- Generate a theme and incorporate it into a headline.
- Work out a rough layout.
- Gather the materials.
- Put up the display.
3.2 Checklist for Instructor - Prepared Bulletin Board
The following points will help you evaluate whether the bulletin board is well - designed and suits its purpose.
- It conveys message quickly and clearly.
- It must be attractive. Color and arrangement catch and hold interest.
- There should be a balance of all the elements.
- Repeated shapes or colors or use of borders hold display together visually.
- It elicits response from the viewer.
- Lettering and visuals can be read across the room.
- Letters are spelled correctly. Lowercase is used except where capitals are needed.
- It should be aligned with lesson objective.
- It is durable and well constructed.
- Neat.
4. Feltboards
These are sheets of felt (or boards covered with felt) on which movable displays can be produced by sticking shapes cut out of or backed with felt onto them.
 |
| Big Board. Retrieve from:https://www.pinterest.co.uk/michelle1801/big-board. Retrieve date: Nov. 19, 2017 |
5. Magneticboards
These are ferromagnetic display boards on which movable displays can be produced using materials that are made of (or backed with) magnetic materials, or are fitted with small magnets. They can be used in much the same way as feltboards and hook - and - loop boards.
 |
Ways to Teach a Bible Lesson-Flannel and Magnetic Boards. Retrieve from:http://www.teachinghelp.org/ways-to-teach-a-bible-lesson-flannel-and-magnetic-boards. Retrieve date: Nov. 19, 2017
6. Flipcharts
A flip chart refers to large sheets of paper fastened together at the top and mounted to an easel. The sheets of paper can also be fixed to a support bar, or a display board by pinning them along their top edges so that they can be flipped backwards or forwards as required in order to reveal the information on a particular sheet, or to produce a fresh blank sheet on which impromptu information can be written or drawn.
Flipcharts are easy to use, inexpensive, portable, and does not need any electricity.
 |
| Flip Chart. Retrieve from:https://www.alibaba.com/product-detail/2015-Zhongjia-stationery-flip-chart-easel_60238192939.html. Retrieve date: Nov. 19, 2017 |
Tips to help you use them effectively.
- The best flip chart stands have clamps at the top and will hold most type of flip chart pads. Most allow you to hang your flip charts while some stands will only allow you to prop them up.
- Make sure the flip charts you use will fit the flip chart stand you will be using. Some have different spaced holes at the top.
- Flip chart pads are usually sold in packages of two and come either plain or with grid lines on them. Using the pad with grid lines makes your job easier for drawing straight lines and keeps your text aligned. Also, make sure the pad has perforations at the top to allow easier removal of sheets. I have seen many presenters struggle to tear off a sheet evenly.
- When preparing your charts, it is best to first design your charts on paper first before drawing them on the actual flip chart pad.
- Lightly write your text in pencil first before using the actual flip chart markers. This will allow you to make any adjustments with text spacing and any figures you will be drawing. Do NOT use all block letters (UPPER CASE). Using upper and lower case letters makes it easier to read. I like to use the 7 x 7 rule. Have no more than 7 words on each line and no more than 7 lines to a sheet. Using a 6 x 6 rule is even better.
- Use flip chart markers and not regular magic markers. Flip chart markers will not “bleed” through the paper. Also, they do not have as strong a smell as regular markers. You can also find “scented” markers. They usually come in various fruit scents.
- Avoid using the colors yellow, pink, or orange. These are extremely difficult for the audience to see. Don’t make your audience have to strain their eyes to see your points. Avoid using too many colors. Using one dark color and one accent color works best.
- You can write “lightly in pencil” any notes next to key points you need. The audience won’t be able to see them. You may also write what is on the next sheet. Knowing this will allow you to properly introduce your next sheet.
- If you make any mistakes you can use “white out” to correct any small errors. For larger areas, cover the mistake with a double layer of flip chart paper and correct the error.
- Have a blank sheet of paper between each of your text sheets. This will prevent the written material from other sheets to “peek” through.
- Properly store and transport your flip charts in a case or the cardboard box that some come in. This will protect your flip charts and keep them fresh and ready to use each time. Take great care of your flip charts. I have some flip charts I have used over 100 times and they still look as good as new.
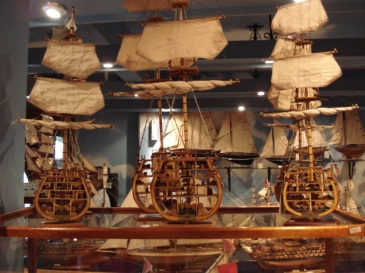
7. Exhibits
Exhibits are displays of various objects and visuals designed to form an integrated whole for instructional purposes. It can be set up on a table or shelf.
 |
| Ocean Science Exhibit Center: Woods Hole Oceanographic Institution. Retrieve from: http://www.whoi.edu/main/ocean-science-exhibit-center. Retrieve date: Nov. 19, 2017 |
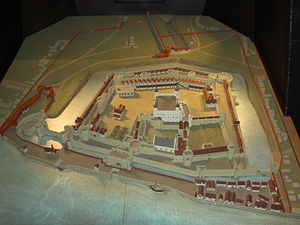
8. Dioramas
Dioramas are statics displays consisting of a three - dimensional foreground and a flat background to create a realistic scene.
 |
| Frank Lloyd Wright's Imperial Hotel. Retrieve from: http://www.wowhaus.co.uk/2013/04/06/frank-lloyd-wrights-imperial-hotel-now-available-as-a-lego-architecture-set/. Retrieve date: Nov. 19, 2017 |
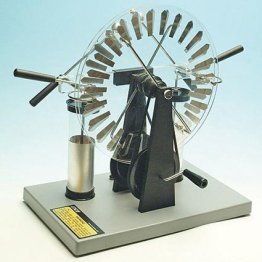
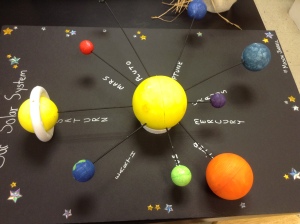
9. Models
- 3 dimensional representation of real things
- can be the same size larger and smaller than the actual one.
- Models (i.e. recognizable three-dimensional representations of real things or abstract systems) can play an extremely useful role in a wide range of instructional situations
- useful in three specific roles, namely, as visual support materials in mass instruction, as objects for study or manipulation in individualized learning, and as construction projects for individuals, small groups or even entire classes.
Types of models:
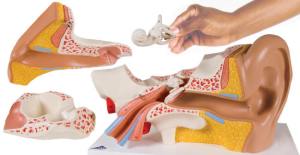
- Solid model– used in recognizing external
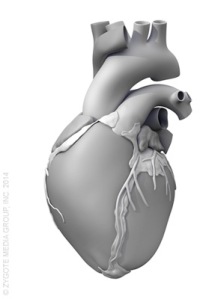
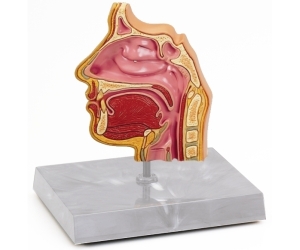
- Cross section model/ cut away – show internal structures
- Construction models – can be assemble and disassemble

- Working models – indicate how things being represented operate
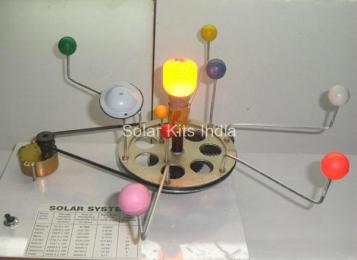


Examples of model can be: Globes, scale models, gear box circuit kits, timing devices, teaching torsos, models of the different parts of body, hands-on-heart models, solar system simulator. 
How can we apply Models in teaching?
Models are used for:


How can we apply Models in teaching?
Models are used for:
- Demonstrating
- Making an impact
- Explaining a process
- Making a topic interesting
- They can be used to reduce very large objects and enlarge very small objects to a size that can be conveniently observed and handled.
- They can be used to demonstrate the interior structures of objects or systems with a clarity that is often not possible with two-dimensional representations and at a cost that is not yet matched by virtual-reality products.
- They can be used to demonstrate movement – another feature that it is often difficult to show adequately using two-dimensional display systems and that is more expensive in virtual-reality experiences.
- They can be used to represent a highly complex situation or process in a simplified way that can easily be understood by learners; this can be done by concentrating only on essential features, eliminating all the complex and often confusing details that are so often present in real-life systems.
REFERENCES:
- Apifania V. Tabbada, Ed.D., Maria Mercedes Buendia, MA. Ed. (2015). Educational Technology 1. Quezon City, Manila, Philippines: Adriana Publishing Co., Inc
- Educational Technology. (2017). Retrieve from https://en.wikipedia.org/wiki/Educational_technology. Retrieve date November 19, 2017
- Non - Projected Media. (July 14, 2015). Retrieve from https://edtechnonprojectedmedia.wordpress.com/. Retrieve date November 19, 2017.
BLOGGER:
As partial fulfillment of our course PIE - 12 (Educational Technology 2), we, BTTE (Bachelor of Technical Teacher Education) students, use to do a blog about the given topic to us. This is actually my first blog and I find it easy and enjoyable.
I appreciate the fact that my own taken photo (the multipurpose board picture) will every one see it and use it as their references like I used to do in this blog. I am proud that I am the one who create and develop that bulletin board. It is feel excited to think that when this topic (Non - Projected Display Materials) is being search or entered in Google search engine it may pop out, including my name! :). I hope that this blog will help the readers and satisfied what they needs.
Thank you to our teacher to give the opportunity to experience this blogging and thank you to all the references and sources.
Thank you for reading. :)
Ronalie D. Avila
BTTE
BTTE

Non-Projected Display Materials: Non - Projected Display Materials >>>>> Download Now
ReplyDelete>>>>> Download Full
Non-Projected Display Materials: Non - Projected Display Materials >>>>> Download LINK
>>>>> Download Now
Non-Projected Display Materials: Non - Projected Display Materials >>>>> Download Full
>>>>> Download LINK ZU
Non-Projected Display Materials: Non - Projected Display Materials >>>>> Download Now
ReplyDelete>>>>> Download Full
Non-Projected Display Materials: Non - Projected Display Materials >>>>> Download LINK
>>>>> Download Now
Non-Projected Display Materials: Non - Projected Display Materials >>>>> Download Full
>>>>> Download LINK FP